Product Structure
Properties, product types, display per channel and text templates — how an article is built
Under Settings → Products → Product Structure you decide how an article is built and what your sales channels show of it. The page has four tabs, and their order is the way through the work:
- Properties — which properties exist and which group they belong to: create, edit, order
groups (address
/settings/master-data/fields). - Product Types — which type asks for which properties, with a detail page per type
(address
/settings/master-data/product-types). - Display per Channel — what the B2B shop, Shopify and Shopware show of the properties
(address
/settings/master-data/fields/channels). - Text Templates — which description comes of it (address
/settings/templates/text-templates). Which text template an article uses is chosen by its product type.
Every tab has its own address; bookmarks keep working. A bookmark to the former channel view of
the properties (with ?channel= in the address) leads to the tab Display per Channel, in the
same channel. The browser's back button switches between the tabs. The search (Ctrl K) finds every
tab by its name, the properties also by the former name “Fields”, the display per channel also by
“product page” or “showcase”.
Properties and Display per Channel each save on their own: what you change in one of the two tabs is collected until you press Save or Discard in the bar at the bottom. If you switch tabs with unsaved changes, the page asks first.
The page exists only for tenants without a JTL connection. Tenants with JTL find Product Templates, Attributes and Text Templates as entries of their own under Settings → Products, as before; they have neither properties, product types nor the display per channel.
Tab “Properties”
Properties are the descriptive details of an article — fit, material, sleeve length, care and so on. The tab always shows the list of all properties in their groups, the master data last. Here you manage the properties themselves; what a channel shows of them is set in the tab Display per Channel.
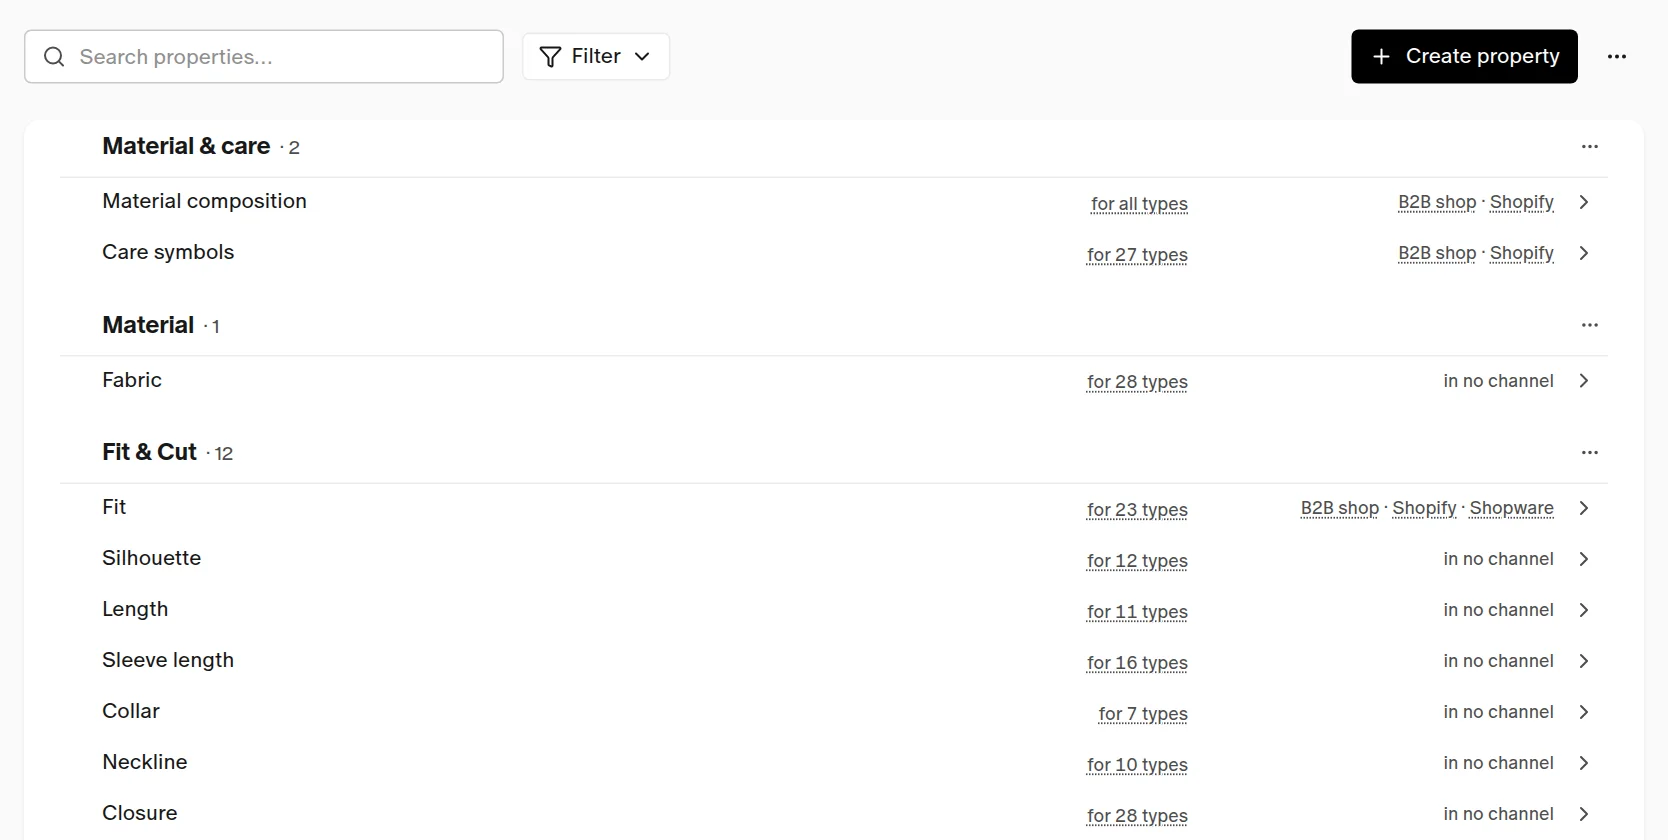
- Create property — the button at the top right. A new property applies to all product types at first.
- Edit a property — a click on the row opens name, group, kind and, for selection properties, the values.
- “for 22 types” — which product types ask for the property. A click opens the list of types; there you check and uncheck types.
- Channels at the row — “B2B shop · Shopware” means: these channels get the property. A click on a channel opens the tab Display per Channel in that channel, with the property highlighted. “in no channel” means: no channel shows it.
- Groups — the menu (⋯) at the group head offers Move up, Move down, Rename and, for an empty group, Remove group. Add group is in the menu (⋯) next to “Create property”. A property belongs to exactly one group.
- Filter “Product type” — shows only what a type asks for. Below it stand the properties it does not ask for, each with Add to ‹type›.
- Search — the search field at the top narrows the list.
The card “In the channels”
In an open property editor stands the card In the channels. It says per channel what it makes of the property — such as on the product page, becomes a filter in the shop or this channel does not take it — and whether it requires it. For Shopify it also shows the name under which the property lives in the shop, and the state of the transfer.
You change that in the channel itself: Change display ↗ (B2B shop), Change transfer ↗ (Shopify) and Change filters ↗ (Shopware) open the tab Display per Channel in a new browser tab, in the right channel and with the property highlighted. The editor stays open.
Properties per colour
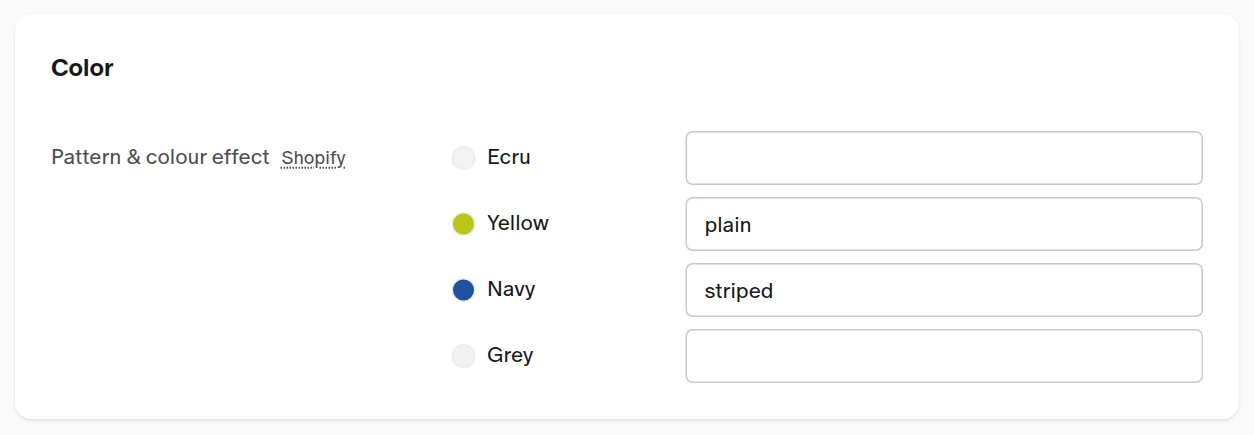
Most properties apply to the whole style: you maintain material or fit once, and every colour shows that value. If one colour differs, you enter a colour exception — the exception. Some details, however, belong to each colour itself: navy is striped, yellow is plain. That is what colour-own properties are for. They have a value of their own per colour and never take the value of another colour or of the style. A colour without a value shows nothing. Two come with the system: Pattern & colour effect and the base colour.
Applies to — set when you create it. When you create a property, Applies to offers All colours (the default) and Per colour.
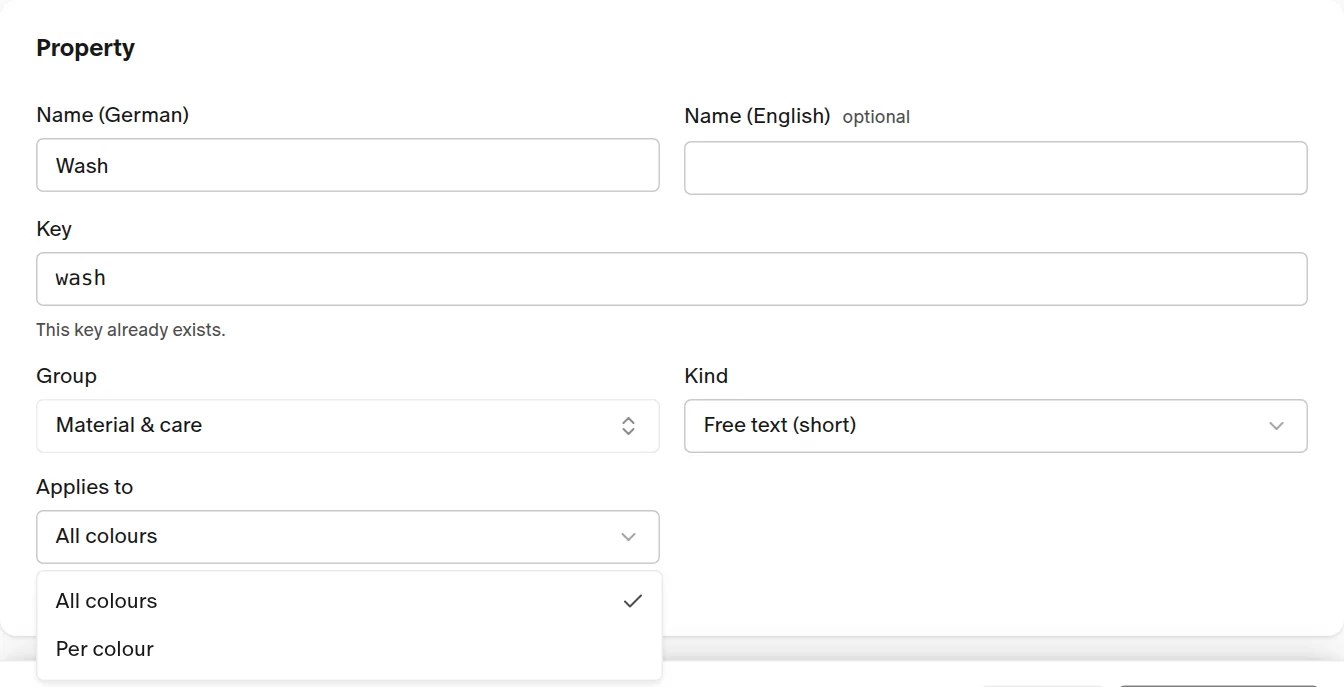
You can change the choice as long as no article carries a value. After that it is locked, like the kind — values do not move over by themselves:

The base colour always applies per colour; its field cannot be switched.
At the article: one input per colour. On the article's Properties page a colour-own property stands in its group with one line per colour — colour dot and colour name in front. A colour without a value has an empty field. Save writes each value to exactly its colour; the other colours do not change. There are no colour exceptions here, since every colour has its own value anyway.
You keep maintaining the base colour in the colour card under Colors & Sizes: a master colour brings it along from the colour master, a free-text colour gets it there by hand.
In the channels. In the tab Display per Channel you put colour-own properties on the product page of the B2B shop or of Shopify like any other. Each colour then shows its own value — navy “striped”, yellow “plain”. The base colour becomes a text line, such as “Base colour: Blue”, in the shop's language and with the name from your list of base colours. Its value comes from the article colour, for a master colour from the colour master. If you rename a base colour, the line changes with the next transfer. Colour filter and colour dots in the shop stay as they are.

A missing value holds back only that colour. “Shown means required” applies here too, but per colour: if navy has a pattern and ecru has none, navy is ready and only ecru waits. That is why the consequence at the row and the question on saving count article colours. At the article, Complete names the colours that lack something and leads to the input with Edit there:

The filter Not ready for … in the article list finds the style as long as one of its colours waits.
Required for all channels and required by a channel
There are two kinds of “required”, and they are set in two different places:
- Required for all channels is set on the product type. The property must be filled in on every article of that type, whichever channel it is sold in — otherwise the article counts as complete nowhere.
- Required by a channel comes from the tab Display per Channel: if a channel gets a property, it must be filled in for that one channel. Other channels are not affected. The article then shows the channel's name at the property.
A property can be both; then the stricter rule counts, that is all channels.
Master data
Country of origin, customs tariff code, weight and certificate are fixed master data. They stand as the last group, apply to every product type and can be given to a channel like any property.
Tab “Product Types”
In the tab Product Types you see which product types exist and add your own subtypes. The product type is the one classification of an article as “what is it” (T-shirt, trousers, sneaker …). It decides which properties, material and care fields an article gets and how it is mapped to the sales channels (the Zalando silhouette, for example).
Stem types and subtypes
- Stem types are the same for all tenants. They carry the channel mapping and the standard properties. You can look at them but not change them.
- Subtypes belong to your tenant. A subtype always hangs under exactly one stem type and inherits everything from it: properties, material and care, channel mapping. That way your vocabulary (“Culotte”, “Palazzo”, “Mom Jeans”) exists in the system without you maintaining channel mappings.
The list shows the stem types per area (clothing, shoes, underwear, sport, accessories) with their subtypes indented below. The column Articles counts how many articles carry the type.
Adding a subtype
- Press Add subtype — or choose Add subtype in the row menu of a stem type; then the stem is already filled in.
- Choose the stem type, enter the German and the English name.
- Optionally set the sort order: a smaller number stands further up under the stem.
- Confirm with Add subtype.
The new subtype appears at once wherever the product type is chosen: when creating an article, in the basic data of the editor (indented under its stem) and in the filter of the article list. The filter for a stem type also finds the articles of its subtypes — “Trousers” finds all culottes too.
Edit, deactivate, delete
The row menu (⋯) of a subtype offers:
- Edit — change names, sort order and the switch Active. Changes apply only after Save.
- Deactivate — the type can no longer be chosen but stays on the articles that carry it. Activate undoes that.
- Delete — only possible as long as no article carries the type. If articles carry it, the dialog offers Deactivate instead, so that no article is left without a type.
A stem type cannot be deleted or renamed, and a subtype cannot have subtypes of its own — there is exactly one level below the stem.
Setting the field set per type
A click on a type opens its detail page. It hangs below the tab: the bar at the top shows Product Structure › Product Types › ‹type›, a click on “Product Types” leads back to the list; the detail page has no tab row. There the field set stands as a table: which properties an article of this type gets, which of them are required, in which position and group they appear in the editor.
The column Origin says where a value comes from:
- Stem default — the standard property of the stem type, the same for all tenants.
- set on the stem — you changed it on the stem type; every subtype inherits that.
- set here — the row deviates on this type.
This is how you work with the table:
- Add a property — choose from all properties of your tenant with the search field at the top right. The property appears visible in the table.
- Switching Visible off hides an inherited property. The row stays dimmed, so that you see what the stem actually provides.
- Switching Required on means “always required for me”: the property counts in the minimum details of the rail. You can lift an inherited requirement here.
- Position (smaller number first) and group change where the property stands in the editor. Empty means: as inherited.
- Reset to inheritance removes the deviation of this row; the row follows the stem again.
Changes apply only after Save in the bar at the bottom — Discard takes everything back. Only the deviation is saved: if you put a switch back to the inherited value, the inheritance stays alive, and a later change on the stem still reaches this type.
After saving, the field set takes effect at once: the editor and the row Minimum details in the rail show the new properties and requirements the next time an article of this type (and its subtypes) is opened.
Default values per type
The column Default in the field set table decides per property what a newly created article of this type starts with — “Fit: Regular” for all trousers, say. The input matches the data type of the property: a choice from the value list, text, number, yes/no or a multiple choice. There is no default for the material composition.
- Below the field it says where the default comes from: Default inherited (from the stem) or Default set here. A subtype inherits the default of its stem and can override it; Reset to inheritance takes its own default back.
- A default on a hidden property is not applied.
- When an article is created (also with “Create and continue”), the defaults are saved as values. The rail counts pre-filled required details as fulfilled; on the article the value can be changed like any other — the default is a help, not a constraint.
- A changed default does not change existing articles. It applies only to articles created afterwards.
On the stem type, the section Subtypes lists your own subtypes with a link to their detail page. Subtypes are still added in the list.
Type settings
Below the field set stands the section Type settings — what used to hang on the product template has its place here. A subtype inherits every setting from the stem until something else is set on the subtype; the line to the right of each field names the origin (not set, set on the stem, set here), and Reset to inheritance takes the deviation out again.
- Description template — the template Regenerate description in the article works with. The list shows the description templates of your tenant (maintained in the tab Text Templates; the link “Manage text templates ↗” opens it in a new tab). Without a template a standard template is used (name, manufacturer text, article type, brand, target group, season, material, country of origin) — an article without a template is no longer an error. The grammatical article comes from the name of the type; a subtype without an entry of its own takes that of its stem.
- Customs tariff suggestion — only with the commodity code switched on. The eight-digit commodity code chosen here appears in the article as a suggestion (“Suggestion of the product type”) and narrows the list; Apply puts it into the field. It is never entered automatically — the classification stays the declarant's decision.
- Layout of the properties page — the groups of the field set in the order in which they appear in the editor. The arrows move a group, the field next to it gives it a label of its own (empty = standard). Groups that join the field set later follow at the end.
The type settings are saved with the same bar as the field set — one Save, one Discard for both.
Tenants with a JTL connection are not affected: there the product templates still decide the description template and the standard commodity code.
Tab “Display per Channel”
Here you decide what each of your sales channels shows of the properties. With the bar next to the search you switch between the channels set up — B2B shop, Shopify, Shopware and, if any, marketplaces. The number behind a channel says how many properties it gets. Without a choice the tab opens on the B2B shop. If no channel is connected yet, the tab says so (“No channel connected yet”).
What a channel shows applies to all product types. An article shows of it what its product type asks for.
B2B shop: the product page
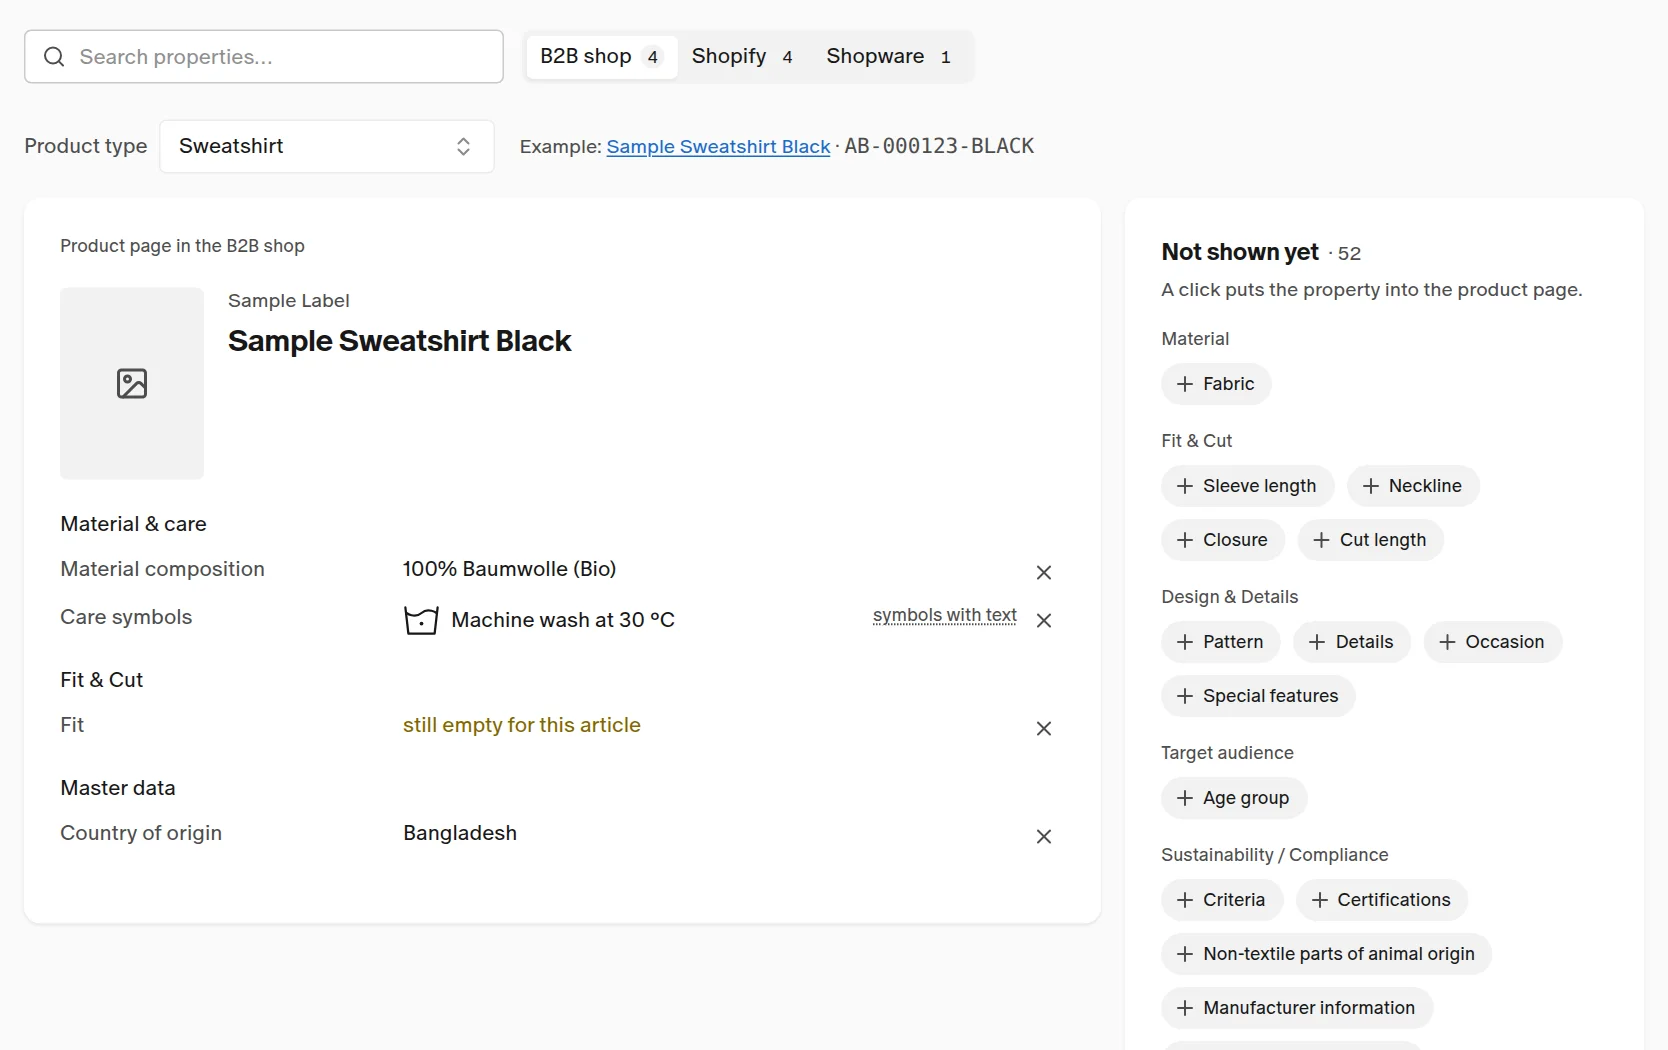
On the left stands the product page as the B2B shop shows it, with the details of a real article. On the right, under Not shown yet, lies what exists but the shop does not show. Every property stands there exactly once — left or right.
- Show — a click on a property on the right puts it into the product page, into its group.
- Take out — the × at the end of the row puts it back to the right.
- Search — the search in the toolbar at the top narrows the list on the right.
If a row says “still empty for this article”, the example article has no value for it. The shop leaves an empty row out; here it stays so that you can take it out.
What the shop shows applies to all product types. An article shows of it what its product type asks for.
The example article
Above the product page you choose a product type. The page picks the article itself: the article of that type with the most properties filled in; on a tie the one with a picture, then the one visible in the shop, then the newest. Its name leads to the article. If a type has no article yet, the product page shows example values and says so.
On the right you first see only the properties the chosen type asks for. “29 more that Sweatshirt does not ask for” unfolds the rest. If you set one of those, it stands below the product page (“Also shown, but Sweatshirt does not ask for them”) — the shop shows it for other types, not for sweatshirts. Add to Sweatshirt makes the type ask for it from now on; it then moves into the product page.
Dragging the order
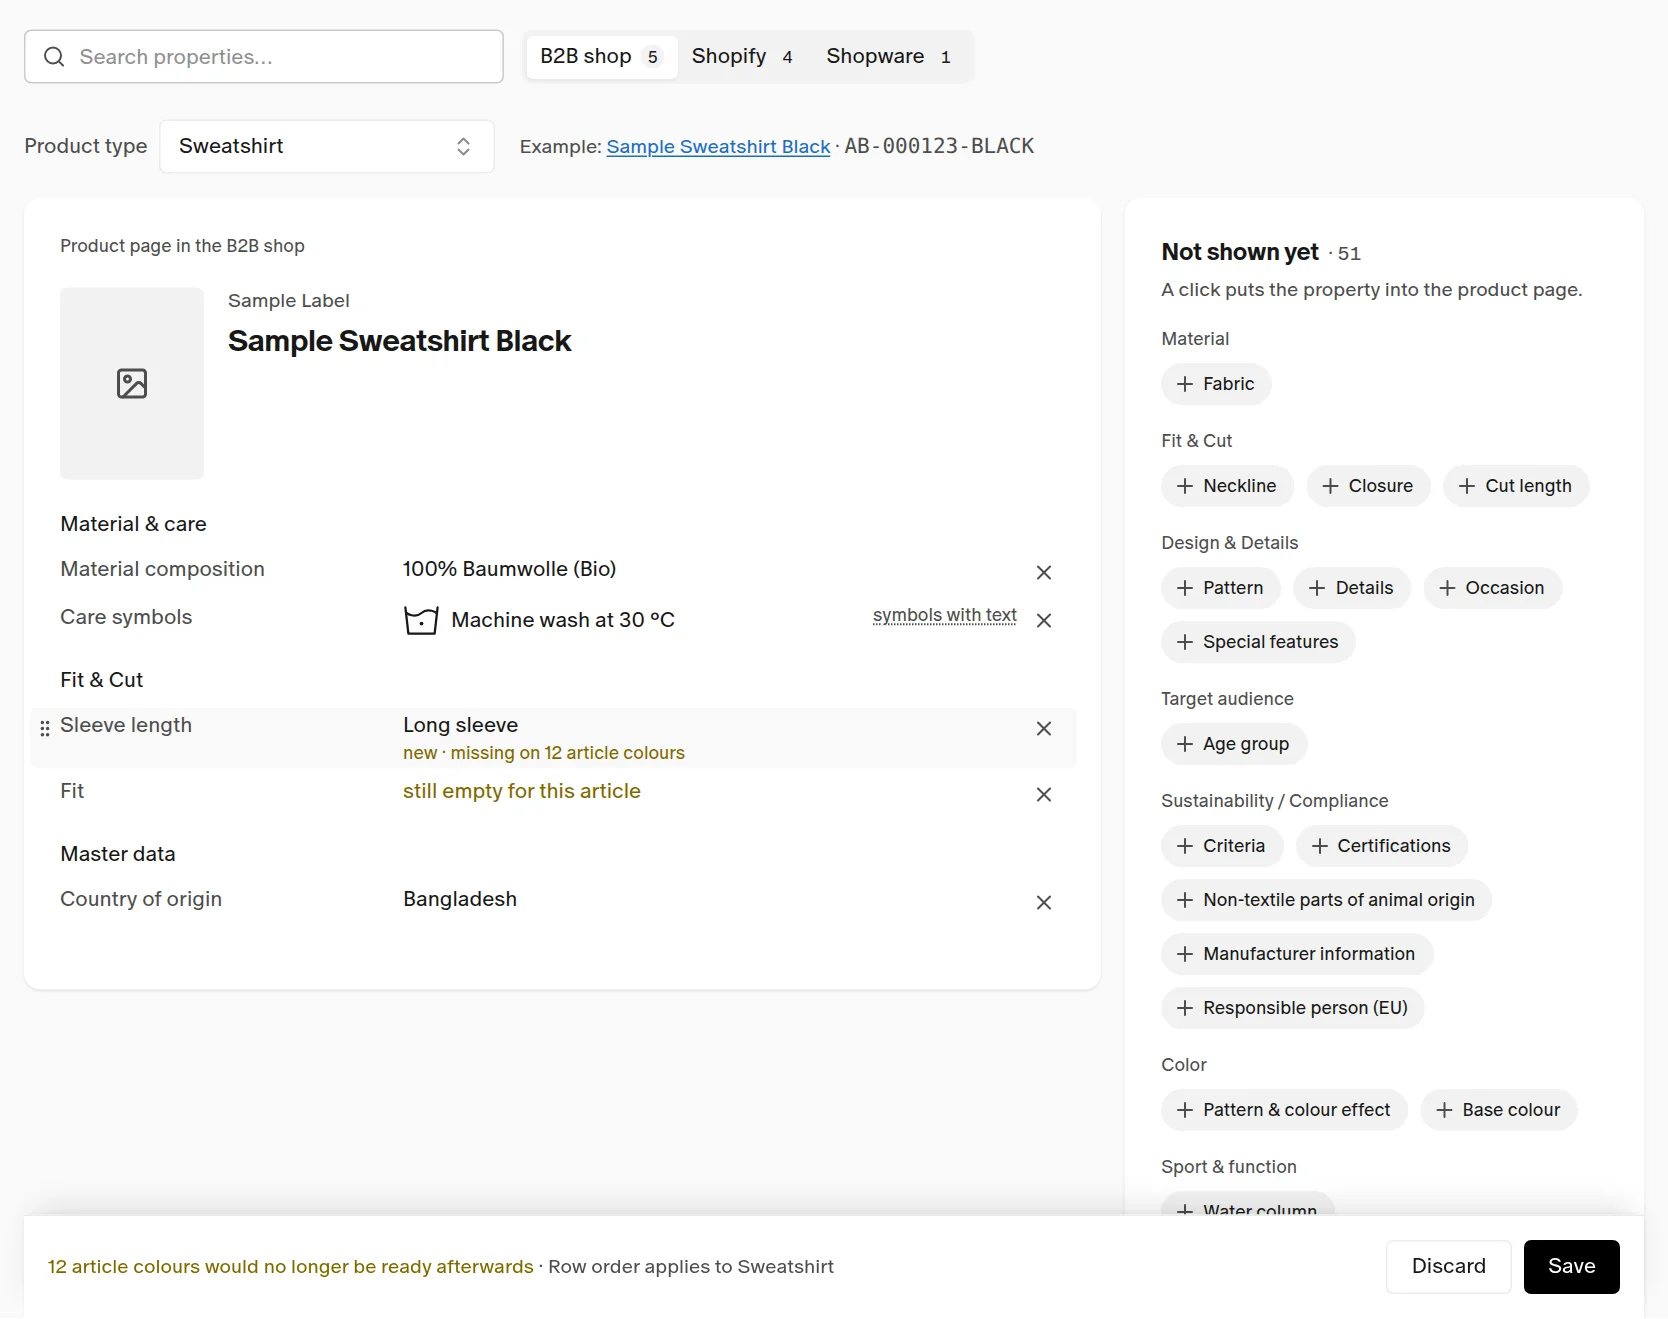
The handle on the left appears as soon as the pointer is over a row or a group heading.
- Drag a group — the order of the groups applies everywhere: in the article editor, on “Complete” and on the product page of every own shop.
- Drag a row — the order of the rows applies to the chosen product type. It is the same order you set as position on the product type. A row stays in its group.
- The master data always stand last and cannot be dragged.
With the keyboard: Tab to the handle, Space picks up, the arrow keys move, Space drops, Escape cancels. The bar at the bottom names what a dragged order applies to (“Group order applies everywhere”, “Row order applies to Sweatshirt”).
Consequences at the row and in the save bar
What a channel shows, it also requires: an article colour without that detail counts as “not ready” for the channel. That is why a newly set row names its consequence right where it stands — “new · missing on 12 article colours” or “new · filled everywhere”. If you take the row out again, the consequence is gone.
The bar at the bottom adds up: “12 article colours would no longer be ready afterwards”. Per channel every article colour counts once; if it lacks something in two channels, it counts twice.
With consequences, Save first asks back. The dialog names the number of article colours per channel and property, split into “already live”, “waiting” and “not switched on”, and leads to the article list with the filter “Not ready for …”. Without consequences the page saves at once.
Shopware: “Becomes a filter in the shop”
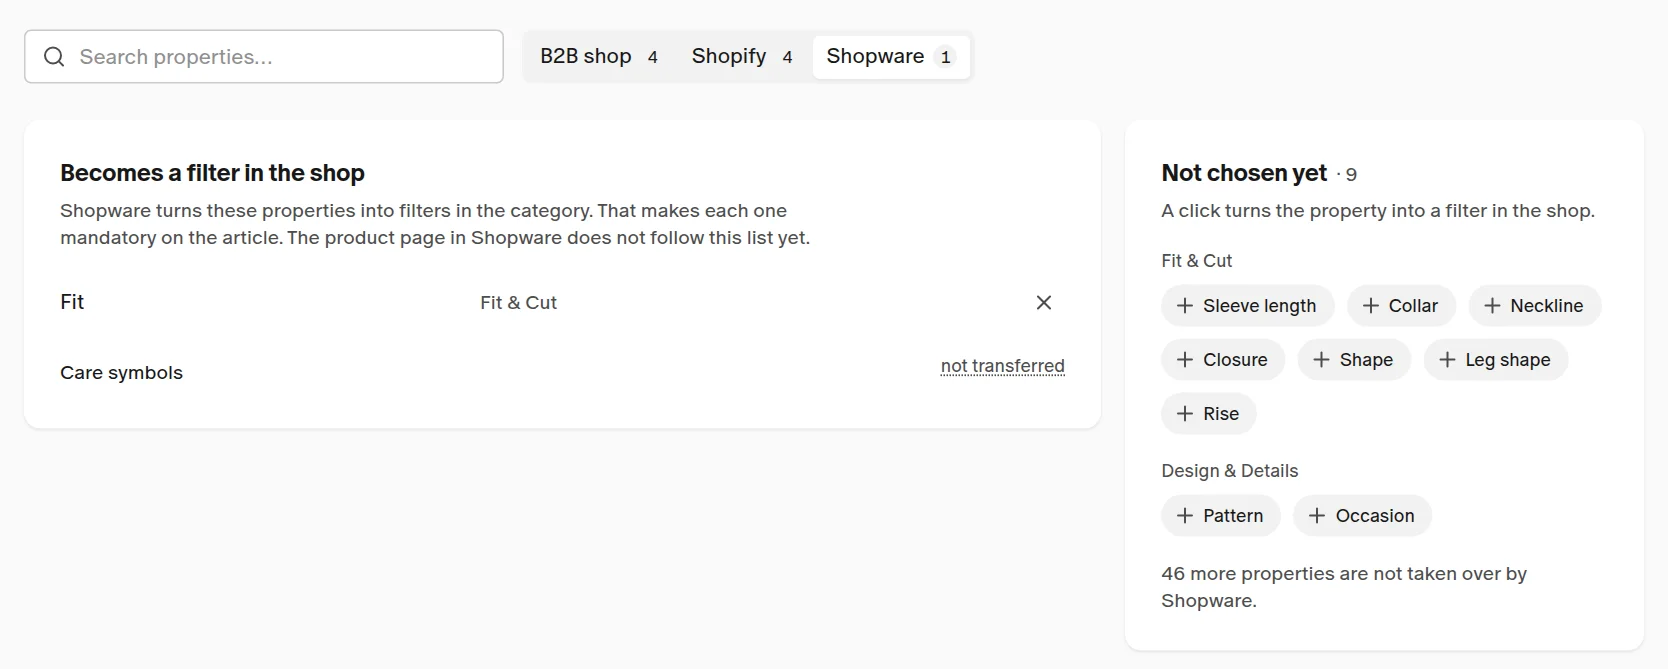
Shopware does not build its product page from this choice. A chosen property becomes a filter in the category there and is therefore required on the article. That is why the left side is not a product page but the list Becomes a filter in the shop.
It works the same way: a click on the right under Not chosen yet turns the property into a filter, the × takes it out. The right side holds only what Shopware takes over; the line at the foot names how many properties are not taken over by Shopware.
Shopify: the product page in Shopify
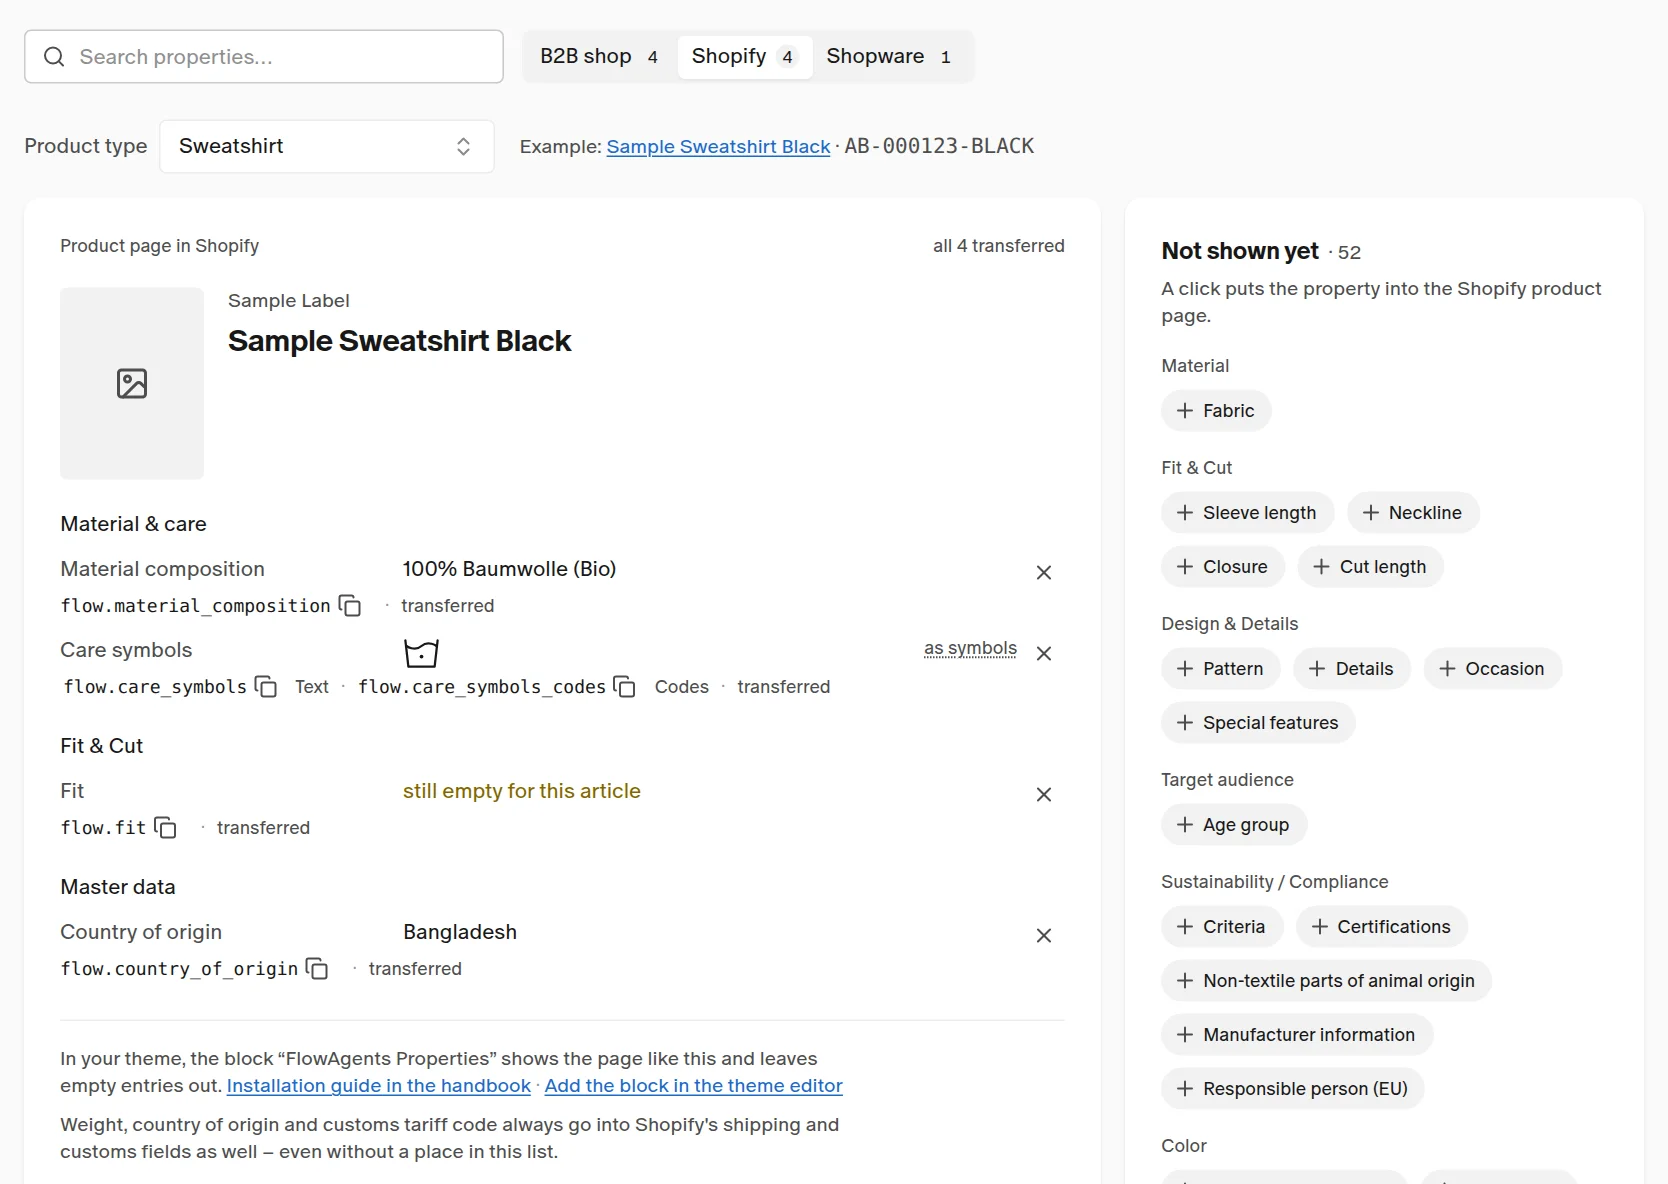
On the left is the product page as the block “FlowAgents Properties” draws it in your Shopify theme — with the same groups, labels and order, filled with the details of a real article. What you drag, add, take out or rename here changes the product page in Shopify once you save, just like for the B2B shop. Handling, product type choice and sample article are the same as there: a click on the right under Not shown yet puts the property onto the page, the × takes it out, the grip drags rows and groups. Every property on the page is required on the article.
What is specific to Shopify:
- Line below: Shopify name and state. Below each row is the name under which the property
also lies in the shop as a field of its own (
flow.fit,flow.material_composition), ready to copy for your theme developer; the care symbols have two names (flow.care_symbolsfor the text,flow.care_symbols_codesfor the codes). After it the state: transferred, waiting for the next sync, transferred after saving (newly set) or Error with the message from the sync and the handle Transfer again. - State line above the page. Next to Product page in Shopify is the sum of all rows — “all 4 transferred” or for example “1 error · 1 waiting · 2 transferred”. If Shopify refused the product page itself, “The product page did not reach Shopify.” follows with the message and Transfer again.
- No price in the header. The sample article shows image, brand and name; the page leaves the price out, because the Shopify price can differ from the B2B list price.
- Taking out has a consequence in the shop. A saved row stays in place after the ×, struck through, with “disappears from the shop at 5 articles” and Undo; the save bar repeats the number. On saving, the plugin deletes the field and all its values in Shopify. Until Shopify has confirmed, the row reads being removed from the shop; if it fails, Removal failed with Try again and Take back in.
- Care symbols work as for the B2B shop: symbols, text or symbols with text — a
click on the form in their row; the preview follows at once. The symbols travel along, the theme
needs no images of its own.
flow.care_symbols(text) andflow.care_symbols_codes(codes) keep going along unchanged. - Master data: weight, country of origin and customs tariff code always go into Shopify's shipping and customs fields as well — even without a place on the page. The sentence below the page reminds you. A place on the page additionally makes the detail a field in the shop and required.
- Not on the page: properties whose Shopify form is not decided yet (number, measurement) cannot be shown by the product page; the line at the foot of the supply names how many. If such a property already goes to Shopify, the page lists it below the product page (“Also goes to Shopify as a field of its own, but is not on the product page”) — it goes as a field of its own only. Properties that apply per colour and the base colour, on the other hand, stand on the page like any other.
flowagents does not see your theme: the preview shows the page the way the block draws it — even when the block is still missing from the theme. Below the page, Add the block in the theme editor opens your shop's theme editor with the block, and Installation guide in the handbook leads to the guide for the block. What else Shopify makes of the page — language, level, errors, the names for your own theme work — is on the page Shopify.
Marketplaces
Marketplaces such as Zalando require their properties themselves. Their view shows the list read-only, every row with the reason. These properties appear automatically on the product types concerned and cannot be unchecked there.
Ways in
Every way to a channel's display leads to this tab, into the right channel and, where there is one, onto the property — it is highlighted there for a moment.
- Channel at a row of the tab Properties — opens the channel in the same window.
- Card “In the channels” in the property editor — Change display ↗, Change transfer ↗ or Change filters ↗ open the channel in a new browser tab; the editor stays open.
- “Display per Channel ↗” on the product type — opens the B2B shop with that type as the example, in a new browser tab.
- Channel mark on the article — if a property carries “B2B shop · Shopify”, a click on it explains why it is required (“Shopify receives this property and therefore requires it.”). “Change for B2B shop” opens the channel; the article's product type is chosen as the example.
- “What does each channel show?” at the end of an article's properties opens the B2B shop.
- Channel settings — B2B shop (Behaviour), Shopware and Shopify (Collection metafields) name the state in one sentence (“Shows 4 properties.”, “Transfers 4 properties.”) and lead to their channel.
The product type you arrive with only chooses the example. What a channel shows applies to all product types.
Tab “Text Templates”
A text template builds the description of an article from its details: blocks with text and placeholders such as article name, brand, material or season. Create new template opens the editor; you edit an existing template from the list. The editor has no tab row — Cancel or Back to overview leads back to the list.
Which articles use a template is not decided here but on the product type (tab Product Types → open a type → Type settings → Description template). The editor points there with “Open product types ↗”.
Placeholders per colour and “Regenerate text”
Colour-own properties appear in the Insert placeholder menu with the suffix (per color) — for example “Made in a {Pattern & colour effect} look”. The base colour is not a placeholder.
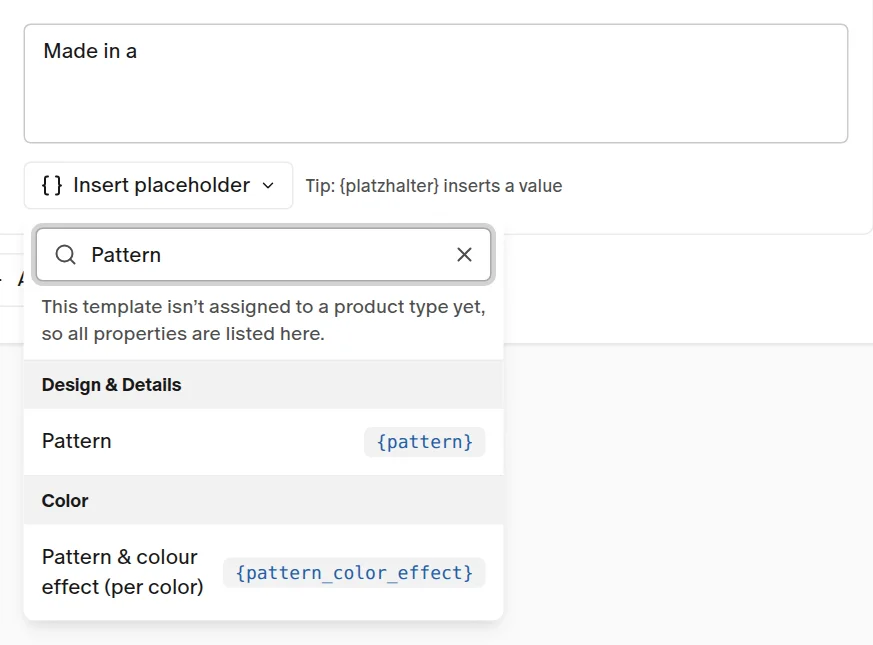
The Preview on the right shows the text for the chosen example article, that is for one colour. Pick another colour and you see its text. If the colour has no value, the placeholder stays empty and the preview says so.
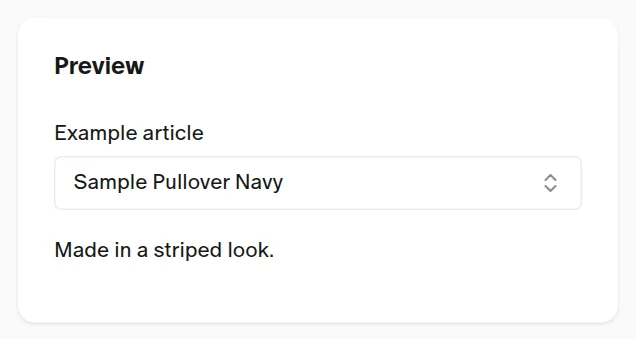
At the article, Regenerate text (page Description, card Text from template) builds the description of the chosen language from the text template of the product type, for every colour with its own values:
- All colours give the same text — it stands once at the style, no colour exception.
- The colours give different texts — the style keeps one text, and every colour whose text differs gets its own as a colour exception of the description.
- If you later align the values and regenerate, the colour exceptions no longer needed go away.

If someone edited a description by hand, the page asks first and names the colours; only Overwrite description replaces it. Tenants with a JTL connection keep using their product templates; nothing changes for them.